First post: Creating a simple web app to list kubernetes resources

Today we're going to overview a fun experiment that involves many aspects of working with Kubernetes. I had a very interesting use case where I needed a simple and easy way for my developers to see some Kubernetes resources. To do that, I created a quick solution which is basically a very simple flask app that does one thing: it lists resources on the Kubernetes cluster it runs on.
I personally thought that this is a specifically interesting experiment since it involved learning how to utilize kubernetes Service Accounts, RBAC, python client, Ingress and more.
All the resources in this article are already hosted on github - Click here to view.
TL;DR
to deploy and check out the application, run:
git clone https://github.com/shay-ul/kubernetes-pods-extractor.git
cd kubernetes-pods-extractor
kubectl apply -f manifests/
Prerequisites
- A running Kubernetes cluster.
- Basic Kubernetes knowledge (i.e - How to apply manifests).
Step 1: Prepare the Kubernetes resources
First, let's create our namespace:
kind: Namespace
apiVersion: v1
metadata:
  name: kubernetes-pods-extractor
Since our application will run inside the cluster, we will need to create a dedicated Service Account that the application will use:
apiVersion: v1
kind: ServiceAccount
metadata:
  name: kubernetes-pods-extractor-sa
  namespace: kubernetes-pods-extractor
Now we need to create a ClusterRole that will enable our ServiceAcccount to get the information needed on pods:
apiVersion: rbac.authorization.k8s.io/v1
kind: ClusterRole
metadata:
  # "namespace" omitted since ClusterRoles are not namespaced
  name: kubernetes-pods-extractor-reader
rules:
- apiGroups: [""]
  resources: ["pods"]
  verbs: ["get", "watch", "list"]
Since we now have a ServiceAccount and a ClusterRole, we need to couple those two together, we will do so using ClusterRoleBinding:
apiVersion: rbac.authorization.k8s.io/v1
kind: ClusterRoleBinding
metadata:
  name: kubernetes-pods-extractor-clusterrolebinding
subjects:
- kind: ServiceAccount
  name: kubernetes-pods-extractor-sa
  namespace: kubernetes-pods-extractor
roleRef:
  kind: ClusterRole
  name: kubernetes-pods-extractor-reader
  apiGroup: rbac.authorization.k8s.io
We are now ready to create our application.
Step 2: Working with Flask and the Kubernetes python client
Let's dive deep into our main script (src/extract_pods.py). Our first function is "get_kube_config":
def get_kube_config():
    try:
        config.load_incluster_config()
    except config.ConfigException:
        try:
            config.load_kube_config()
        except config.ConfigException:
            raise Exception("Could not configure kubernetes python client")
    v1 = client.CoreV1Api()
    return v1
This function will basically load the ServiceAccount token if it runs inside the cluster, or your local kubectl context if you run the script locally.
How will the Kubernetes client know which one to choose? Well, our script just tries both methods (try-except). If it can't load the in-cluster config, it will then go and look for the kubernetes context (config.load_incluster_config vs config.load_kube_config).
When we ask the Kubernetes client to load the in-cluster config, it basically looks for the ServiceAccount token which should be loaded to "/var/run/secrets/kubernetes.io/serviceaccount/token" file. If the ServiceAccount was configured correctly on the pod level, we should have no problems querying the Kubernetes API from within our pod.
Our next function is the main function, which will call our previous explained get_kube_config function. It will then iterate over all pods in the cluster and create a dedicated list (pods_details_list). This list will be comprised from dictionaries, each one will hold the specific details of a specific pod: name, namespace, ip, node, status.
def main():
    v1 = get_kube_config()
    pods = v1.list_pod_for_all_namespaces(watch=False)
    pods_details_list = []
    for pod in pods.items:
        status = get_pod_status(pod)
        dict = {
            "name": pod.metadata.name,
            "namespace": pod.metadata.namespace,
            "ip": pod.status.pod_ip,
            "node": pod.spec.node_name,
            "status": status
        }
        pods_details_list.append(dict)
    return (pods_details_list)
The main function calls for one more function called get_pod_status:
def get_pod_status(pod):
    status = pod.status.phase
    for container_status in pod.status.container_statuses:
        if container_status.started is False or container_status.ready is False:
            waiting_state = container_status.state.waiting
            if waiting_state is not None:
                status = waiting_state.reason
    return status
This function is basically a workaround for fetching the pod status. See, when kubectl get pod fetches a pod status, it does a similar thing. It looks for containers failing inside the specific pod, then reports back the specific problematic container status as the entire pod status. This is what we're doing here, since the python kubernetes client won't give us a simpler method to get this information.
The next part will be the entry function for the entire script. Since our script will be ran upon a HTTP request to Flask, we need to initialize our Flask app:
@app.route('/')
def hello_world():
    return render_template('index.html', pods_list=main())

if __name__ == '__main__':
    app.run(host="0.0.0.0", port=8080)
The most important line in this function is return render_template('index.html', pods_list=main()).
This line will be executed when an HTTP request hits our flask application, and it will render a JINJA2 template file (src/templates/index.html) and forward a list called pods_list as a variable to this template. The list contains the return values from our "main" function, described above.
Now that we understand our main script, we can have a look at our template (src/templates/index.html):
<link rel="stylesheet" href="https://cdn.jsdelivr.net/npm/bootstrap@4.1.3/dist/css/bootstrap.min.css" integrity="sha384-MCw98/SFnGE8fJT3GXwEOngsV7Zt27NXFoaoApmYm81iuXoPkFOJwJ8ERdknLPMO" crossorigin="anonymous">
<table class="table table-striped">
    <thead>
      <tr>
        <th scope="col">Name</th>
        <th scope="col">Namespace</th>
        <th scope="col">IP</th>
        <th scope="col">Node</th>
        <th scope="col">Status</th>
      </tr>
    </thead>
    <tbody>
        {% for pod in pods_list %}
        <tr>
        <td style="width: 10%;">{{ pod['name'] }}</td>
        <td style="width: 10%;">{{ pod['namespace'] }}</td>
        <td style="width: 10%;">{{ pod['ip'] }}</td>
        <td style="width: 10%;">{{ pod['node'] }}</td>
        <td style="width: 10%;">{{ pod['status'] }}</td>
        </tr>
    {% endfor %}
    </tbody>
  </table>
In this template, we are using basic bootstrap so our table will look pretty.
Our pod data is populated since we are iterating over our pods list which is recieved as an input to this template ({% for pod in pods_list %}).
Step 3: Build and package our application
our application is ready, but we now need to package it to a container image. To do so, we need to create a new Dockerfile:
FROM python:3.7-slim-buster

COPY src /app/
COPY requirements.txt /app/requirements.txt

RUN apt-get update \
    && pip install --upgrade pip \
    && pip install --no-cache-dir -r app/requirements.txt

WORKDIR /app/
CMD ["python3", "extract_pods.py"]
As you can see, we will build our image on top of python:3.7 image and our application will run as a simple python script when our container starts.
We will also need a requirements.txt file that will hold our pip dependencies:
kubernetes==24.2.0
flask==2.2.2
We are only using two packages, which makes our requirements file kind of small :)
You can now build and push your container image to any registry. If you wish to avoid building and pushing your own image, you can use the image published from my source repository:
shayulmer/kubernetes-pods-extractor:latest
This image is automatically built and pushed using Github Actions on any push to the main branch on my source repostory (some very basic CI, you can check it out here)
Step 4: Deploy our application
Finally, we can now apply our application to Kubernetes, using this Deployment:
apiVersion: apps/v1
kind: Deployment
metadata:
  name: kubernetes-pods-extractor
  namespace: kubernetes-pods-extractor
  labels:
    app: kubernetes-pods-extractor
spec:
  replicas: 1
  selector:
    matchLabels:
      app: kubernetes-pods-extractor
  template:
    metadata:
      labels:
        app: kubernetes-pods-extractor
    spec:
      containers:
      - name: kubernetes-pods-extractor
        image: shayulmer/kubernetes-pods-extractor:latest
      serviceAccountName: kubernetes-pods-extractor-sa
Our ServiceAccount is mounted to our pod in the last line of this file.
And now we can expose the deployment using a service:
apiVersion: v1
kind: Service
metadata:
  annotations:
  name: kubernetes-pods-extractor-service
  namespace: kubernetes-pods-extractor
spec:
  ports:
  - name: http
    port: 80
    protocol: TCP
    targetPort: 8080
  selector:
    app: kubernetes-pods-extractor
  type: ClusterIP
Step 5: We are done!
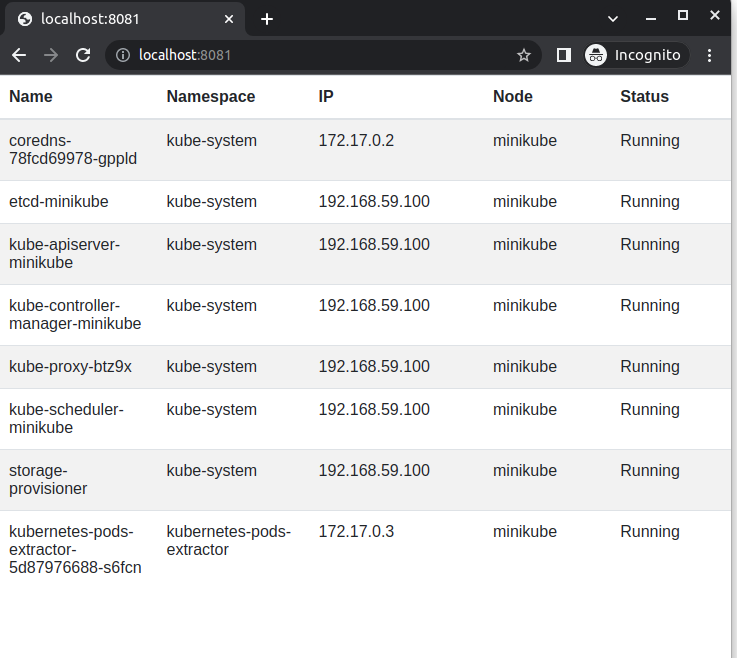
Everthing is ready for us to access our application. All we need is to run:
kubectl port-forward svc/kubernetes-pods-extractor-service 8081:80 -n kubernetes-pods-extractor
Access http://localhost:8081 and behold!
If we wish to expose this service to (potentially) the entire world, we can do so using an Ingress object, but this is a topic for our next post :)