
Exposing an app on GKE using Ingress and TLS Termination
I recently needed to expose an application that runs on GKE to the outside world. To do that, I had to learn and use GKE's way of working with Ingress and Load Balancers. Although it's not too complicated (compared to other Ingress implementations), there are some technicalities that we need to resolve first.
Overview
Today we will expose a simple "hello world" app (shayulmer/loadbalancer-tester container image) to the world, using TLS on GKE. This app serves as a web server that prints out the hostname of the running container, so we would be able to see the GCP Load Balancer in action.
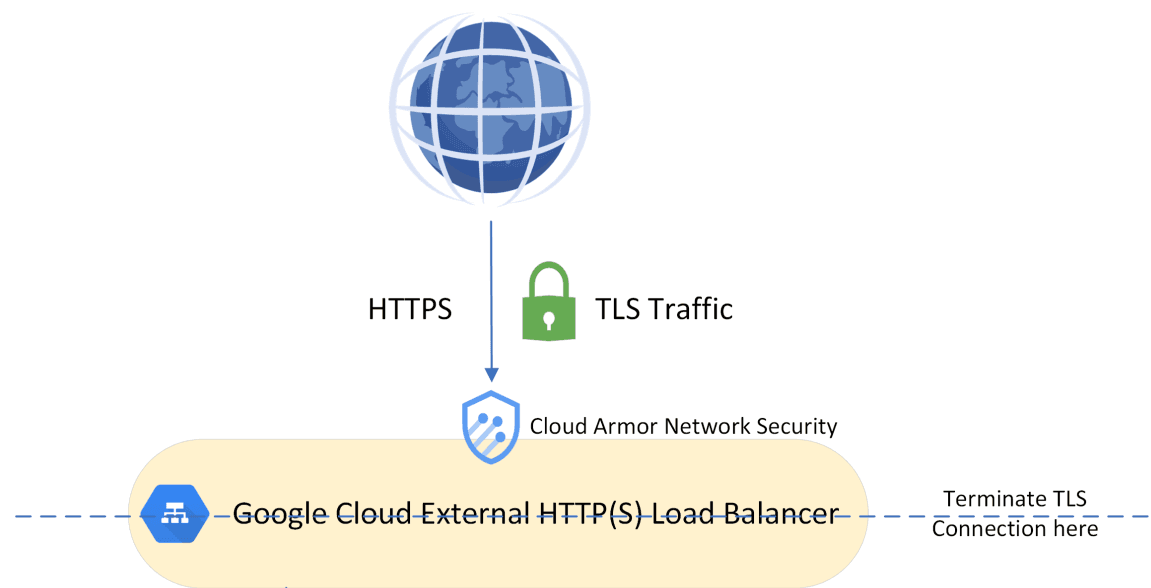
The application itself runs on HTTP, but we will expose it over HTTPS using a GCP Managed Certificate and TLS Termination on our Ingress Load Balancer. We will also use Google Cloud Armor to limit traffic to the Load Balancer.
Prerequisites
A running GKE Cluster
Basic Kubernetes knowledge - understanding of Deployments, Services, Ingress.
gcloud CLI configured and logged in to the relevant GCP Project.
The Helm Chart
The following repository contains a helm chart for today's experiment: https://github.com/shay-ul/gke-ingress-example
Note: If you are going to deploy this helm chart on your environment, make sure to override the values.yaml file with your specific environment's details.
Since we want to see what's being deployed to GKE, we will not go over the helm chart itself. Instead, we will discuss the Kubernetes Manifests which are being generated from this chart. We will generate the manifests using this command:
helm template hello-world . -f values.yaml
Step 1: Prepare the GCP Infrastructure
Since we want to issue a public Google-managed certificate, we have to use an external HTTP(S) Load Balancer[1]. When working with External Load Balancers, we have to consider two things:
Public Static IP - External GCP Load balancers (unlike their AWS counterparts) will not receive a dynamic DNS that points to a dynamically allocated IP address[2]. Instead, you have to manually point a DNS Record to the IP address assigned to the Load Balancer. To verify the IP address will never be changed (and the DNS will always point to the correct address), we have to request a Global Static Public IP. This address will be attached to our Load Balancer.
Manage IP Whitelist - Our application will be widely accessible over the internet unless we limit who can access our application. Since this is just a test run, we will utilize Google's Cloud Armor to block traffic which is not originated from IP addresses we specifically allow.
Step 1.a - Request a Global Static IP Address
To do this, we will run the following command:
gcloud compute addresses create gke-ingress-example-address --global
After the request is completed, we can observe the allocated IP using this command:
gcloud compute addresses describe gke-ingress-example-address --global
Register the address shown since you will need it later for the DNS record settings.
Step 1.b - Configure Cloud Armor Policy
Here we will create a new network security policy:gcloud compute security-policies create gke-ingress-example-security-policy`
Next we will create a default rule to block all traffic, with the lowest priority allowed (2147483647):
gcloud compute security-policies rules update 2147483647 --security-policy gke-ingress-example-security-policy --action "deny-502"
And finally, we will add our "Allow" rule to allow traffic from known IPs:
gcloud compute security-policies rules create 1000

    --security-policy gke-ingress-example-security-policy

    --description "allow traffic"

    --src-ip-ranges "192.0.2.0/24"

    --action "allow"
Make sure to insert your specific allowed IP Addresses or subnets.
Step 2: The Deployment
Let's dig into our Kubernetes Manifests which were generated by the Helm Template. This is our deployment, which is very basic:
# Source: gke-ingress-example/templates/deployments/deployment.yaml
apiVersion: apps/v1
kind: Deployment
metadata:
  name: hello-world-deployment
  labels:
    app: hello-world
spec:
  replicas: 3
  selector:
    matchLabels:
      app: hello-world
  template:
    metadata:
      labels:
        app: hello-world
    spec:
      containers:
      - name: hello-world-deployment
        image: shayulmer/loadbalancer-tester
        ports:
        - containerPort: 80
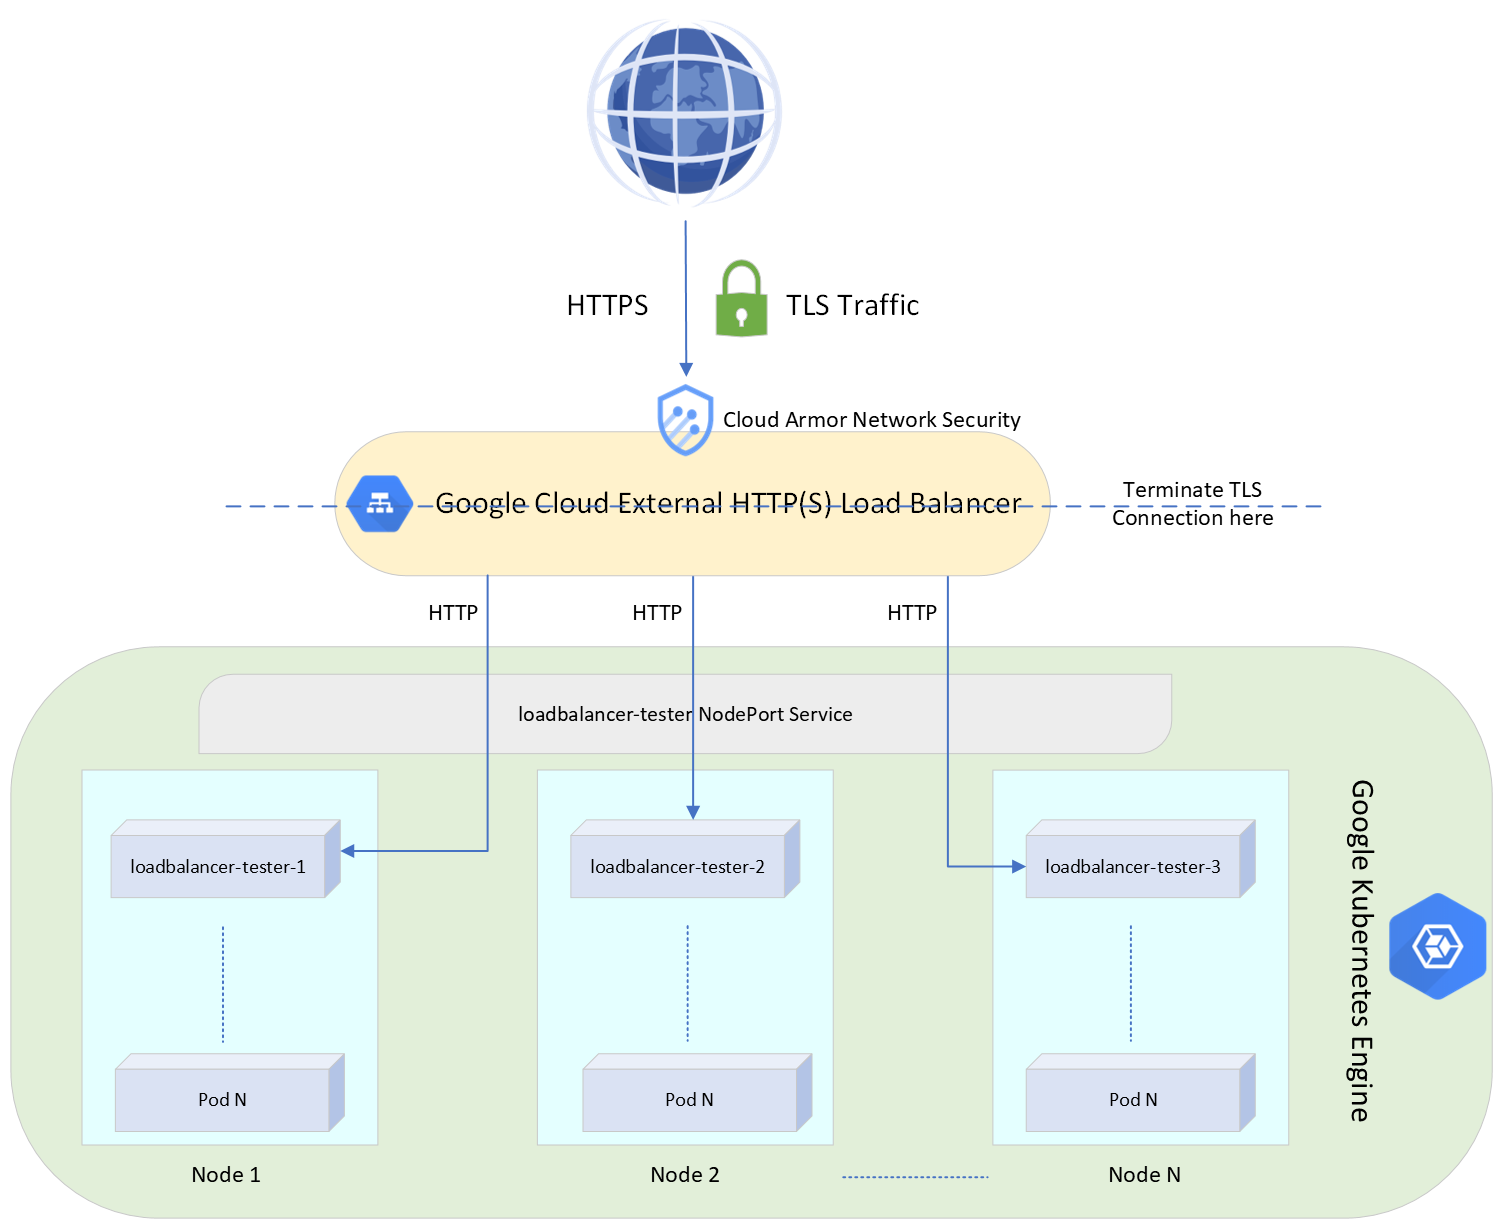
This is the Kubernetes Service which exposes the deployment. Notice how it references a "backend-config", which we will deploy and discuss in a moment:
---
# Source: gke-ingress-example/templates/services/service.yaml
apiVersion: v1
kind: Service
metadata:
  name: hello-world-service
  labels:
    app: hello-world
  annotations:
    cloud.google.com/backend-config: '{"default": "hello-world-gke-backend-config"}'
spec:
  type: NodePort
  selector:
    app: hello-world
  ports:
    - protocol: TCP
      port: 80
      targetPort: 80
Note: External GKE Load Balancers will not work with ClusterIP Services [4], therefore our service type is "NodePort".
Now it's time for the Backend Config which is referenced by the Service. This config specifies the desired Cloud Armor Security Policy (which we created earlier):
---
# Source: gke-ingress-example/templates/crds/gke-backend-config.yaml
apiVersion: cloud.google.com/v1
kind: BackendConfig
metadata:
  name: hello-world-gke-backend-config
spec:
  securityPolicy:
    name: gke-ingress-example-security-policy
BackendConfigs can be very important if your application does not return HTTP 200 response code on the "/" path. The Load Balancer health check defaults to this path, so if your app will not return 200 OK on "/", the Load Balancer will show "unhealthy backends" and will not work. To fix this, you will need to directly configure a different health check on the BackendConfig: https://cloud.google.com/kubernetes-engine/docs/concepts/ingress#direct_hc
Since we want to redirect all traffic to HTTPS, we also need a Kubernetes Custom Resource named FrontendConfig. We will later reference this config in our Ingress object:
---
# Source: gke-ingress-example/templates/crds/gke-frontend-config.yaml
apiVersion: networking.gke.io/v1beta1
kind: FrontendConfig
metadata:
  name: hello-world-gke-frontend-config
spec:
  redirectToHttps:
    enabled: true
We also need to create a GCP Managed Certificate. This certificate will be used on the Ingress object. The most crucial part of this manifest is specifying the correct domain, since the certificate will be verified and signed against the specified domain name.
---
# Source: gke-ingress-example/templates/crds/gke-managed-certificate.yaml
apiVersion: networking.gke.io/v1
kind: ManagedCertificate
metadata:
  name: hello-world-managed-cert
spec:
  domains:
    - gke-ingress-example.devoops.blog
And lastly, our Ingress which puts it all together:
---
# Source: gke-ingress-example/templates/ingress/ingress.yaml
apiVersion: networking.k8s.io/v1
kind: Ingress
metadata:
  name: hello-world-ingress
  annotations:
    kubernetes.io/ingress.class: "gce"
    networking.gke.io/managed-certificates: hello-world-managed-cert
    kubernetes.io/ingress.global-static-ip-name: gke-ingress-example-address
    networking.gke.io/v1beta1.FrontendConfig: hello-world-gke-frontend-config
spec:
  rules:
  - host: gke-ingress-example.devoops.blog
    http:
      paths:
      - path: /*
        pathType: ImplementationSpecific
        backend:
          service:
            name: hello-world-service
            port:
              number: 80
See how under "Annotations", the Ingress references the names of the following:
Our Ingress class ("gce", which is the External Load Balancer ingress class)
The managed certificate which will be used to initiate TLS Sessions
The Global Static IP address which should be attached to the Load Balancer.
The FrontendConfig which redirects HTTP traffic to HTTPS.
After reviewing the generated manifests, we may now install our Helm Chart. Verify you are in the desired Namespace and run:
helm install hello-world . -f values.yaml
Step 3: Signing the certificate
Google signs certificate requests with DNS validation[5]. All we have to do is go to our DNS provider and make sure our ingress domain name (in our case - gke-ingress-example.devoops.blog) points to the global static IP address we requested earlier. After this is done, we will wait for the ManagedCertificate to become "Active". This can take some time due to DNS propagation delay.
You can check the ManagedCertificate status by running:
kubectl get ManagedCertificate


Once the certificate is signed (Active), it's going to take a few more minutes for GCP to configure the certificate on the load balancer (this will happen automatically).
Step 4: Successful Deployment!
we can finally access our application securely (from Cloud-Armor whitelisted IP addresses only):
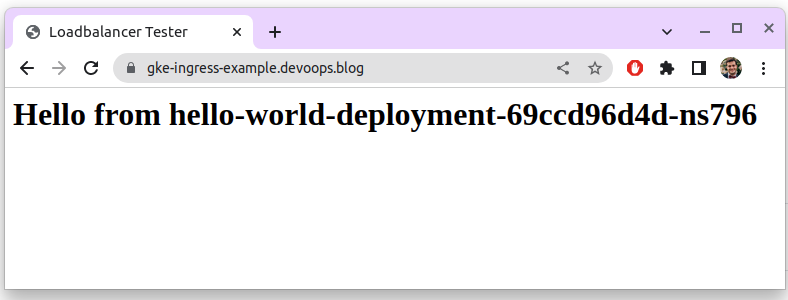
Pro tip: Refresh the application (or browse from multiple tabs) to see the Load Balancer in action. The hostname of the pod changes as the Load Balancer distributes traffic to different pods.
Mission Accomplished! It was quite a challenge to figure all of this out, but once the concepts are laid out - I believe it's not too hard to understand and deploy.
The best part of this experiment is that now we have a valid Helm chart template for exposing an application on GKE. To take this to the next level, we can even sync this chart to our cluster with a GitOps tool like ArgoCD, but this is a topic for another post :)

